I wanted an original looking gas cap for my 1966 Barracuda
I lost the gas cap for my 1966 Barracuda long ago; either I didn't re-install it after gassing up or it was stolen while I was parked in downtown Houston. The only replacement that I could find at the time was this clunky looking Stant G27 gas cap. It worked O.K., but I never liked the looks. Over the years, I've tried to find an original cap, an original looking cap, or anything else but this one and they are just hard to find. I doubt that a 1966 gas cap would still be available through the original manufacturer, and it would be very expensive since small parts can have a high cost similar to prices found on luxury bath accessories.
Actually that old replacement gas cap is a solid, well built unit. The cap part is heavy gauge chrome plated steel and the black handle is cast aluminum alloy or some similar metal. It has held up well for the 30 something years that I've had it.
Hope springs eternal
Now that my Barracuda is rolling again after 20 years in storage. I checked online and in local auto parts stores for any currently available gas caps for the old A-body cars. I think I found one of those old clunky G27 Stant caps online - for something like $50. I think it was listed as NOS (new old stock). Caps for the old A-body cars aren't even listed in the local auto parts stores. However, I recently found this Stant 11811 which looked like it might fit and it did have the look I wanted. It's for the newer cars with unvented gas tanks. It has a built-in relief valve to let air into the tank as the gasoline is sucked out. But the cam-lock part is just slightly larger than the opening in the older A-body tank filler tube.
The cap is painted stamped sheet steel and the handle is plastic. The inside parts are very solid looking. I discarded the warning label, since it doesn't apply in my application.
My plan
I didn't want to try to enlarge the filler neck opening, but I realized that the Stant 11811 and the old replacement cap could be disasembled and that there might be a way to combine the old cam-lock parts with the Stant 11811 cap and handle, so that's what I did.
As I said, the exterior of this Stant 11811 replacement cap is very similar to the original A-body gas cap but the cam-lock doesn’t fit inside the filler neck. However, the old Stant replacement can be disassembled with a Phillips screwdriver and the interior parts of that cap can be installed on the exterior parts of the new replacement. It only requires a little tricky drilling, grinding, and fitting.
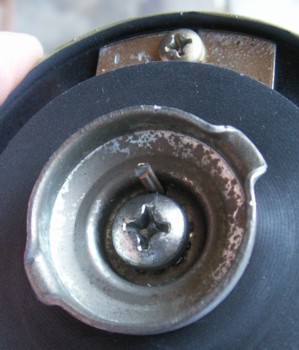
These photos show the 11811 with the outer handle, cover, and 'brass strap' removed. I drilled into the square metal part at the center to remove the brass strap. The rubber gasket has been removed from the inside part.
Remove the handle and cap from the 11811 by unscrewing the two Phillips-head screws.
Drill and/or grind the rivet-like material that holds the brass strap to the rest of the cap’s interior parts.
Find a nut that fits the screw from the old gas cap.
Find a ‘fender’ washer (thin washer with large outer diameter) and drill its center hole out to fit over the bump of the pressed-in area of the brass strap piece. (The fender washer, or other shim material, helps 'backup' and stabilize the cam-lock to the brass strap.)
Use the large Phillips screw from the old gas cap and the nut you found and secure the old cam-lock, gasket, brass spring washer, and fender washer to the brass strap piece with the nut in the recess. The nut will be in the recess in the brass strap.
Estimate where the tabs on the cam-lock should line up when the cap handle will be horizontal, then tighten the nut securely. Use a wrench. Warning: If the nut isn’t tight enough, you can get the cap fastened and then find that it won’t come out unless the nut is almost completely unscrewed and you sure don’t won’t all those pieces falling down the gas tank filler pipe.
Line up the cap holes with the brass piece and press the nut into the hole in the middle of the cap.
Attach the handle to the cap.
Check alignment on the filler tube. If the handle isn’t exactly horizontal, rotate the cam-lock with channel locks or similar wrench. I needed to tighten mine to get it to line up and that worked well. If you have to rotate in the loosening direction to get the alignment, you may have to retighten and start again.
When you have the alignment to suit you, drill a small hole (3/32” or smaller) through the entire assembly (but not through the plastic handle, of course) just to the side of the head of the screw. Select a place where the hole will be hidden under the handle. I thought I had a 3/32” roll-pin so I drilled a 3/32” hole. The roll-pin was too small, but I broke the drill in the process of drilling the hole, so I used the shank of the bit. As I did the final tightening the various layers shifted just enough to grip the bit. I don’t think there’ll be any problem with the parts coming loose.
Since the old cardboard washer and back-up brass spring washer didn't provide a snug fit, I took the rubber washer from the newer cap and put it on over the cardboard. I also added some additional gasket material between the filler neck and body panel to get the opening a little more recessed and that made the cap fit closer to the body panel.
Now it just needs to be painted to match the body color.
(Well, the body needs to be painted body color, too.)
PAGE ONE - This page gives some details about the Barracuda and its history. There are photos of all sides of the car,photos of the short block in the car and the empty engine compartment, and shots of the greasy engine as it was pulled out. There is a photo of wreck damage to the left front fender. There are photos of the heads that have been in storage for 20 years after they were rebuilt. There is a photo comparing the original carburetor that was destroyed in storage and a NOS carburetor that someone gave me. There are photos of the automatic transmission and the gas tank. Links to other web articles are located on Page One
PAGE TWO - Page two has more detailed photos of the exterior and interior of the car. The pinstripes are shown and the dash and instrument panel. Front bucket seats and folding back seat and trunk panel. Photos of grille sections and taillight.
PAGE THREE - This pages has photos of the engine rebuilding work in progress at Cookie's Auto Machine Shop. It shows the bare short block, piston installation, and Cookie at work.
PAGE FOUR - Page four has 14 images showing the completed engine after it was painted and then after the exhaust manifolds, pulleys, fan, brackets, distributor, coil, and such had been re-installed. It seemed to be easier to install all those things before putting the engine in the car. My only concern is fitting the left manifold around the steering column while dropping the engine in.
PAGE FIVE - Page five has photos and comments of the engine re-installation. I demonstrate that I can carry the transmission (without the torque converter). There are a couple of photos of the clean engine compartment before the engine was installed and then a couple more of the engine after it was installed. I photographed the antifreeze warning and battery charge warning decals on the radiator support panel.
PAGE SIX - Page six has a photo of the Barracuda parked out in the driveway on the first day of spring 2004 and closeups of the carburetor as it is installed and the engine compartment with the engine in running configuration. It has been driven about 15 miles since the overhaul. There is a photo of the bottom of the car and of the left rear axle and brake parts with the wheel and brake drum removed.
BRAKES - Photos of complete rebuild of front drum brakes including removal of backing plate and regreasing bearings. Photos of back brakes and bearing plus back brake hose.
Alternator Wiring - Photos showing every connection from battery to alternator power output terminal and wiring through the voltage regulator to the field connection on the alternator. The wire I.D. numbers for the shop are given along with wire gauge and wire insulation color.
Instrument Panel Removal and Disassembly - This page shows photos of the instrument panel partially removed from the dash and the various connections that are made there. It also has detailed photos of the instruments and the printed circuit boards on the back and details of the speedometer mechanism.
A-Body Gas Cap Replacement - Photos of combining an old replacement cap and a new Stant 11811 cap to make a usable replacement for the original.
Barracuda History - This site provides an excellent brief history and description of the early Barracudas.
ULTRAJOSH - This site is an excellent resource for everyone who is working with the early Mopars. In addition to photos and details of his work on a '66 Barracuda there are links to sources of hard to find parts and instructions for all sorts of electrical work as well as mechanical. Check out this site. It may have just what you need to solve a Mopar problem! I found a source for an electronic voltage regulator that is built into a mechanical regulator case which accepts the original wiring connections!